 There’s something about Disney that’s so … magical. I don’t think I know anyone that doesn’t like Disney. In fact, I don’t even know anyone who is neutral about Disney. Everyone loves Disney! So why not make a Disney-themed manicure? This week’s manicure is a tribute to none other than Minnie Mouse! The bright red bow on top of a demure off-white manicure makes me think of the early days of Disney, which I love just as much as the Disney princess era. Read on to learn how to get the look.
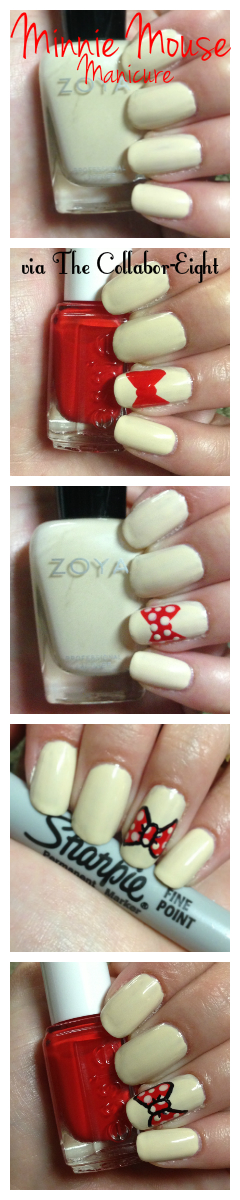 I started this manicure like any other – with clean nails and a coat of Nail Tek II. I like to keep my nails healthy and strong and nothing works better than Nail Tek II.
I used Zoya’s Jacqueline for my base color. It’s a creamy off-white color, perfect for an old-school tribute to Minnie Mouse. If you wanted to make the manicure brighter, a stark-white polish like Zoya’s Snow White would be perfect.
The bow detail looks way more complicated than it is, so don’t worry! Create the base of your bow by taking your favorite red polish – I used Essie’s Snap Happy – and creating a bow shape on your accent nail(s). You can do this by making the shape of a butterfly, more or less – a thin oval in the middle with two wings out to each side.
Let the beginning of your bow dry a bit, and then begin creating the polka dots. I used Zoya’s Jacqueline again for the polka dots – I really liked the idea of the dots being the same color as my background. I carefully dipped my dotting tool (a bobbi pin – who knew you could use a bobbi pin for manicures?!) into my polish and created several small, off-white dots across the bow.
Outlining the bow is easier than you’d think – simply take a Sharpie (my new favorite manicure tool) and outline your bow, starting with the center knot, followed by the outside edges, and finish with two little lines coming out from the center knot.
To prevent your cute new nail design from smudging, finish with a quick dry top coat, like Seche Vite, but only after you’ve let your polish dry for a few minutes.
Are you as in love with this manicure as we are? Let us know in the comments!
Check out more great manicure tutorials:

[…] fingers you applied white polish. I’ve used Sharpie in plenty of manicures, so I’ve tested and tested this. Give your Sharpie design a good 20-30 minutes to dry and then carefully sweep on […]